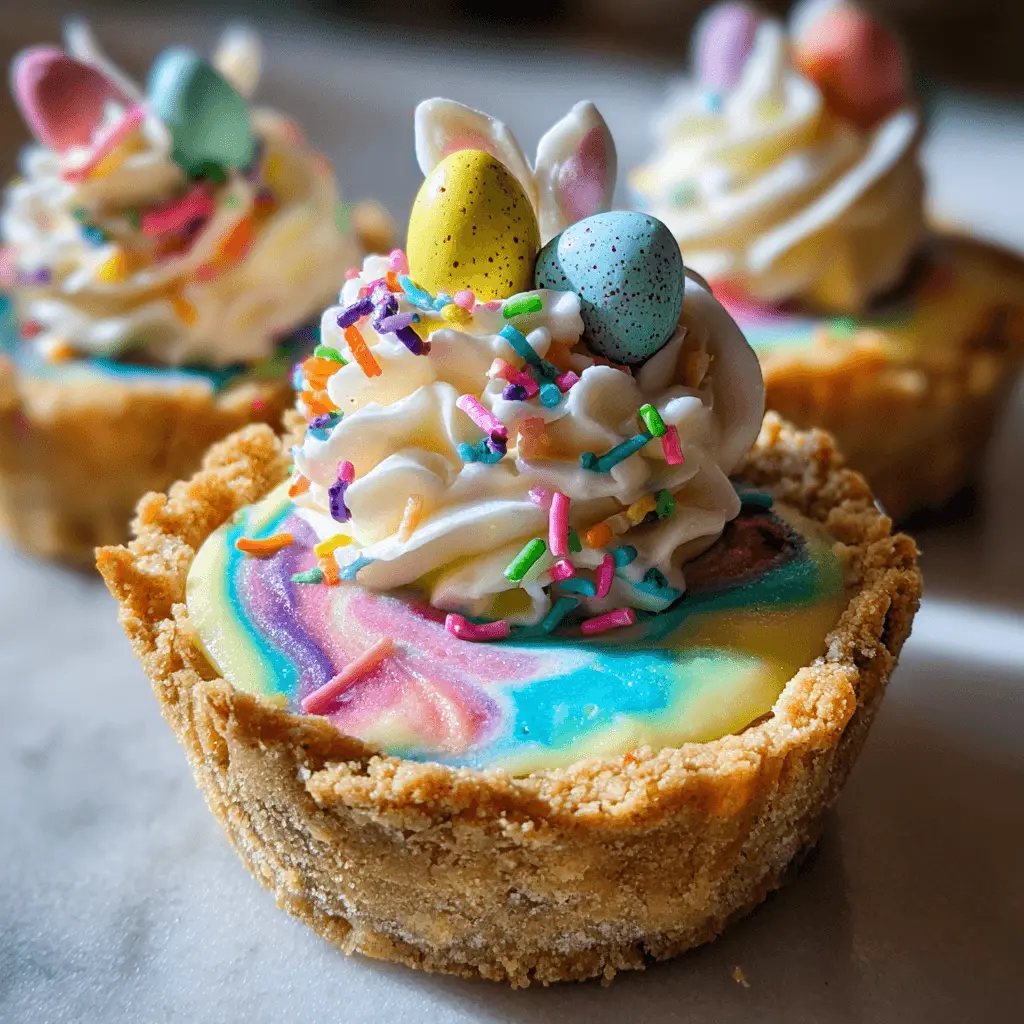
Welcome to your new favorite Easter dessert! These no-bake mini Easter cheesecakes are vibrant, easy to make, and perfect for spring celebrations. You get all the creamy, dreamy cheesecake flavor without ever turning on your oven. They’re a delightful treat for any springtime gathering, especially for busy parents and beginners looking for a simple, impressive dessert.
Why You’ll Love These No-Bake Mini Easter Cheesecakes
You will adore these no-bake mini Easter cheesecakes for so many reasons! They simplify dessert preparation without sacrificing flavor or appeal.
- Effortless Preparation: No oven required means less stress and a cooler kitchen.
- Make-Ahead Magic: Prepare them days in advance and store them in the freezer for ultimate convenience.
- Perfect Portions: Individual servings eliminate the need for slicing and messy plates.
- Beautiful Presentation: Their delicate pastel layers and light, fluffy texture are truly eye-catching.
- Crowd-Pleaser: These sweet treats are a hit with both cheesecake enthusiasts and skeptics alike.
Ingredients
Gather these simple ingredients to create your festive no-bake mini Easter cheesececakes. Quality components ensure the best results every time.
- For the Crust:
- 6 oz shortbread cookies (approx. 12 round cookies): Choose buttery, crisp shortbread cookies for the best flavor.
- .5 oz unsalted butter ((1 TBSP), melted): This binds the cookie crumbs together.
- For the Cheesecake Filling:
- 2 TBSP cold water: Essential for hydrating the gelatin.
- 1 packet unflavored powdered gelatin (1/4 oz, or 2.5 tsp): This is crucial for giving the cheesecakes their firm, unmoldable structure. Understanding the science behind gelatin in no-bake desserts can help ensure your cheesecakes set perfectly.
- 1 lb cream cheese (full-fat, at room temperature): Full-fat cream cheese delivers the richest, creamiest texture.
- 3.5 oz granulated sugar (½ cup): Provides sweetness and helps achieve a smooth filling.
- ½ tsp lemon juice: Brightens the flavor of the cheesecake.
- 1 tsp vanilla bean paste (can substitute vanilla extract): Offers a rich, aromatic vanilla flavor.
- Pinch of salt: Balances the sweetness and enhances other flavors.
- 1 cup heavy cream (at room temperature): Adds a light, airy texture and body to the filling.
- Assorted gel food coloring (4 colors recommended, I use Americolor brand): For creating beautiful pastel layers.
- For Decoration:
- ½ cup whipped cream: For a creamy, light topping.
- Candy eggs: A charming and festive touch for Easter.
- Sprinkles: Add extra sparkle and color.
Notes & Substitutions
- Shortbread Cookies: You can easily swap shortbread for graham crackers, vanilla wafers, or even chocolate sandwich cookies. Adjust the melted butter slightly if needed; some crumbs absorb more than others.
- Gelatin: Unflavored gelatin is vital for stability, allowing these no-bake mini cheesecakes to hold their shape perfectly when unmolded. Do not omit it.
- Cream Cheese: Always use full-fat cream cheese at room temperature. Cold cream cheese will result in a lumpy filling. Low-fat cream cheese can alter the texture and setting properties.
- Vanilla: If you don’t have vanilla bean paste, use an equal amount of good quality vanilla extract. For a twist, try almond or lemon extract in its place.
- Food Coloring: Gel food colorings offer much more vibrant and concentrated color compared to liquid dyes. This ensures beautiful, distinct pastel layers without thinning the filling.
Equipment
Having the right tools makes assembling these no-bake mini Easter cheesecakes a breeze.
- Jumbo silicone muffin pan: Essential for easily unmolding your individual cheesecakes.
- Baking sheet: Provides stability for the flexible silicone pan during transport.
- Food processor or rolling pin: For efficiently crushing your shortbread cookies.
- Stand mixer with paddle attachment or hand mixer: To create a perfectly smooth cream cheese filling.
- Small microwave-safe bowl: For dissolving the gelatin.
- Mixing bowls: Several small bowls are useful for dividing and coloring the filling.
- Cookie scoop or spoon: Helps in evenly portioning the layers.
- Tart tamper (optional): A great tool for firmly pressing the crust into place.
Instructions
Follow these clear, step-by-step instructions to create your delightful no-bake mini Easter cheesecakes. Read through all the steps before you begin for the smoothest process.
Prepare the Crust:
Place a jumbo silicone muffin pan on a baking sheet. Blitz the shortbread cookies in a food processor, or crush them in a plastic bag with a rolling pin until they’re fine crumbs. Mix them in a small mixing bowl with the melted butter until moistened. Divide the shortbread crumbs between the 6 cavities in the muffin pan. Press them firmly into the bottom of the pan to form your cheesecake crust.
Hydrate Gelatin:
Place the cold water in a small bowl. Sprinkle the gelatin on top, then whisk them together. Let the bowl sit for 5 minutes so the gelatin can hydrate and absorb the water, becoming firm.
Make Cheesecake Filling:
Meanwhile, put the room temperature cream cheese in the bowl of a large stand mixer fitted with a paddle attachment. Beat it until it is smooth, creamy, and free of lumps. (A hand mixer can also be used.) Add the sugar, lemon juice, vanilla bean paste, and salt. Mix well, scraping the bottom and sides of the bowl occasionally. With the mixer running on low speed, gradually add the room temperature heavy cream, mixing until everything is smooth and well-combined.
Incorporate Gelatin:
Once the gelatin feels very firm, microwave it for 10-15 seconds. It should be fully melted, liquid, and warmer than room temperature but not hot. Use a small whisk or spoon to stir the gelatin and ensure it’s lump-free. Add the warm liquid gelatin to the room temperature cheesecake filling. Mix it in by hand, scraping the sides and bottom well. Ensure no lumps remain. Note: Temperature greatly affects the outcome of these no-bake mini Easter cheesecakes. If the gelatin is not warm enough, or the cheesecake mixture is too cold, the gelatin might begin to set before it is evenly mixed, causing clumps.
Color the Filling:
Divide the cheesecake mixture into 4 equal portions (each should be about 7 oz if you measure them). Stir a drop of a different gel food coloring into each portion, mixing until the color is smooth and uniform.
Layer the Cheesecakes:
Take your first color and divide it between the 6 crust-filled cavities. A cookie scoop works fastest and easiest, but a regular spoon is fine. Spread it into a smooth layer with the back of a spoon. Quickly add a second color on top of the first. Continue to layer the cheesecake colors until all 4 have been added to the pan. It’s important to work fairly quickly during this step so the cheesecake colors don’t start to set too much and become difficult to spread.
Chill and Set:
Smooth the tops of the cheesecakes. Place them in the freezer for at least 2 hours to firm up; they should feel very solid to the touch before you try to unmold them. The exact time depends on your freezer’s temperature. If making them in advance, wrap the outside of the mold well with plastic wrap to prevent freezer burn. Thaw the cheesecakes overnight in the refrigerator the day before you need them before unmolding.
Unmold and Decorate:
Press from the bottom of one of the silicone cavities and turn it upside-down, pushing the cheesecake out into your hand. Repeat until all the cheesecakes have been unmolded. Let the cakes sit at room temperature for 30 minutes to warm slightly. Then top each cheesecake with a swirl of whipped cream, a pinch of sprinkles, and a few candy eggs, if desired. Serve chilled but not frozen.
Pro Tips for Perfect No-Bake Mini Easter Cheesecakes
Achieve flawless no-bake cheesecakes every time with these helpful hints.
- Temperature Matters: Always ensure your cream cheese and heavy cream are at room temperature. This prevents lumps and ensures a smooth, uniform filling.
- Gelatin Handling: Microwave gelatin just until liquid and warm. Overheating can reduce its setting power, while underheating can cause clumps in your filling.
- Work Quickly: Once the gelatin is incorporated, the filling starts to set. Layer your colors efficiently to avoid a clumpy or uneven texture.
- Achieve Smooth Layers: Use a cookie scoop for consistent portions, then gently spread each layer with the back of a small spoon or offset spatula.
- Prevent Sticking: A silicone muffin pan is highly recommended for easy unmolding. If you use a metal pan, line each cavity with paper liners or acetate strips.
- Deep Colors: Use quality gel food coloring for vibrant, non-diluted pastel shades. Liquid food coloring can make the filling too thin.
Serving, Storage, and Make-Ahead Options
Make the most of your delightful no-bake mini Easter cheesecakes with these tips.
- Serving: For the best texture, serve your cheesecakes chilled but not frozen solid. Allow them to soften slightly at room temperature for about 20-30 minutes before enjoying.
- Storage: Store any leftover cheesecakes wrapped individually or together in an airtight container. They will stay fresh in the refrigerator for 4-5 days. For optimal food safety of dairy-based desserts, it’s always good to review safe handling and storage guidelines for cheesecakes.
- Make-Ahead: These mini cheesecakes are perfect for preparing in advance! Freeze them in the silicone mold for up to a week. Wrap the entire mold tightly with plastic wrap to prevent freezer burn. Thaw them overnight in the refrigerator before serving and decorating.
Variations
- Crust: Get creative with your crust! Try vanilla wafers, Oreo cookie crumbs, or even ginger snaps for a different flavor profile.
- Flavor: Beyond vanilla, consider adding almond, coconut, or orange extract to the filling. Fresh lemon or lime zest also adds a lovely bright note.
- Toppings: Dress up your cheesecakes with fresh berries, a spoonful of fruit compote, mini chocolate chips, or white chocolate shavings.
- Presentation: If you prefer not to use gelatin, serve the cheesecake filling in small glasses or mini jars for a delightful spoonable dessert.
Nutrition Information
Here’s an estimated nutritional breakdown per serving for your no-bake mini Easter cheesecakes.
| Nutrient | Amount Per Serving |
|---|---|
| Calories | 450 kcal |
| Total Fat | 35g |
| Saturated Fat | 20g |
| Cholesterol | 100mg |
| Sodium | 200mg |
| Total Carbohydrate | 28g |
| Dietary Fiber | 0g |
| Total Sugars | 22g |
| Protein | 7g |
Please note: Nutritional information is an estimate based on ingredients and preparation. Exact values may vary depending on specific brands and quantities used.
Frequently Asked Questions (FAQ)
Here are answers to common questions about making these no-bake mini Easter cheesecakes.
- Is gelatin essential for this recipe? Yes, gelatin is crucial for giving these cheesecakes the firm structure needed for unmolding. If you plan to serve them directly in cups, you can omit it.
- Can I use flavored gelatin? No, avoid flavored gelatin. It has a different gelatin content and added sugar, which will affect the stability and texture of the cheesecake.
- What if my cheesecake is too thick or thin to layer? If the mix is too thick, your gelatin might have been too cold or started setting too quickly; try reheating the gelatin slightly next time. If it’s too thin, ensure your cream cheese was at room temperature and your heavy cream was incorporated fully.
- Can I make a large no-bake cheesecake using this recipe? Yes, absolutely! Use an 8-9 inch springform pan and press the crust into the bottom. Chill it in the refrigerator for at least 6-8 hours, or preferably overnight, instead of freezing.
- What if I don’t have a silicone pan? You can line a traditional muffin tin with paper liners or acetate strips for easier removal. Lightly greasing a metal pan before adding liners also helps.
Conclusion
These no-bake mini Easter cheesecakes are the ultimate easy, festive dessert, perfect for any spring gathering. Their vibrant colors and creamy texture make them a delightful treat that’s surprisingly simple to prepare. So, skip the oven and create these charming individual cheesecakes for your next celebration. We promise they will be a huge hit! Don’t forget to share your beautiful creations with us and leave a review below!