Get ready to create an adorable and delicious dessert for your Easter celebration! These delightful mini Easter cheesecake jars are incredibly easy to make, especially with the help of your Instant Pot. Serving them in individual jars makes for a charming presentation and hassle-free portions. You will love decorating these cute treats with festive Easter candies and vibrant green coconut.
Why You’ll Love These Mini Easter Cheesecake Jars
These individual cheesecakes are perfect for anyone looking for a simple yet impressive dessert. Here’s why you will adore making these mini Easter cheesecake jars:
- Quick Cooking: The Instant Pot dramatically speeds up the baking process.
- Perfect Portions: Individual jars mean no slicing and easy serving for everyone.
- Adorable Theme: They’re decorated to look like tiny Easter baskets.
- Kid & Adult Friendly: A treat everyone will enjoy, from little ones to grown-ups.
- Minimal Effort: Achieve maximum charm with straightforward steps.
- Great Make-Ahead: Prepare them in advance to reduce holiday stress.
Ingredients
Gathering your ingredients is the first step to creating these charming mini Easter cheesecake jars. Using room temperature items is key for a smooth batter, so plan ahead!
For the Cheesecake Filling:
- 16 ounces cream cheese, softened
- 1/2 cup granulated sugar
- 2 teaspoons lemon juice
- 1 teaspoon vanilla extract
- 2 large eggs, room temperature
For the Graham Cracker Crust (Optional):
- 1 cup crushed graham crackers
- 2 tablespoons melted unsalted butter
- 1 tablespoon granulated sugar
For Decoration:
- 1 cup sweetened shredded coconut
- Green food coloring (gel or liquid)
- 6 bunny Peeps
- 18 mini chocolate eggs
Notes & Substitutions
For the smoothest cheesecake, ensure your cream cheese is very soft. You can microwave it for 15-20 seconds if you forget to take it out early. If you want to change the crust, try crushed Oreo cookies or shortbread cookies instead of graham crackers. For toppings, feel free to use fresh berries, a dollop of whipped cream, or a drizzle of lemon curd for a different flavor. Always use room temperature eggs; this helps them incorporate better into the batter, preventing overmixing.
Equipment
Having the right tools makes preparing your mini cheesecakes simple and enjoyable.
- 6-quart or 8-quart Instant Pot
- Six 4 oz mason jars with lids or foil
- Electric hand mixer or stand mixer
- Instant Pot trivet or steamer rack
- Oven mitts or kitchen tongs
Instructions
Follow these easy steps to create your delightful mini Easter cheesecake jars. The Instant Pot simplifies the process, making it perfect for beginners.
1. Prepare the Graham Cracker Crust
Start by finely crushing your graham crackers. You can use a food processor or a Ziploc bag and a rolling pin for this. In a small bowl, combine the crushed graham crackers with the melted butter and granulated sugar. Mix until well combined. If you want a crust at the bottom, press 1-2 tablespoons of this mixture evenly into the bottom of each 4 oz mason jar. Alternatively, reserve all the crust mixture to sprinkle on top of the cheesecakes later for a crumbly topping.
2. Make the Cheesecake Batter
Using an electric hand mixer or stand mixer, beat the softened cream cheese and sugar together on high speed until the mixture is light and fluffy. This should take about 2-3 minutes. Next, add the lemon juice and vanilla extract to the cream cheese mixture and continue mixing until everything is smooth and fully incorporated. In a separate small bowl, gently whisk the room temperature eggs just until the yolks and whites are combined. Slowly add the whisked eggs into the cream cheese filling, mixing on low speed for only about 1 minute. Be careful not to overmix the batter once the eggs are added; overmixing can introduce too much air, which can lead to cracks.
3. Fill the Jars
Carefully scoop the thick cheesecake batter into your prepared mason jars. Fill each jar almost to the rim, reaching the bottom of where the lid would typically screw into place. If you opted to place the crust on top, now is the time to add about 1-2 tablespoons of the graham cracker mixture onto the batter in each jar and press it down gently. Loosely cover each jar with its lid or a small piece of aluminum foil. Do not twist the lids tightly; they should just rest on top to prevent condensation from dripping onto the cheesecakes.
4. Pressure Cook the Cheesecakes
Pour 1 1/2 cups of water into the inner pot of your Instant Pot. Place the Instant Pot trivet or steamer rack into the pot. Carefully arrange the filled and loosely covered jars on top of the trivet, ensuring they are stable. Secure the Instant Pot lid, making sure the sealing vent is set to the “Sealing” position. Select the “Pressure Cook” or “Manual” setting and set the cooking time to 7 minutes on high pressure.
5. Cool and Chill
Once the cooking cycle is complete, allow a full natural pressure release. This means letting the pressure release on its own until the float valve drops. This slow release is crucial for preventing cracks in your cheesecakes. Once the pressure has fully released, carefully remove the hot jars from the Instant Pot using oven mitts or tongs. Immediately remove the loose lids or foil from each jar. Let the cheesecakes cool completely at room temperature on a wire rack or counter. They might look puffy or have slight cracks at this stage, but cooling slowly will help them settle. Once they are at room temperature, transfer the jars to the refrigerator to chill thoroughly for at least 4 hours, or preferably overnight.
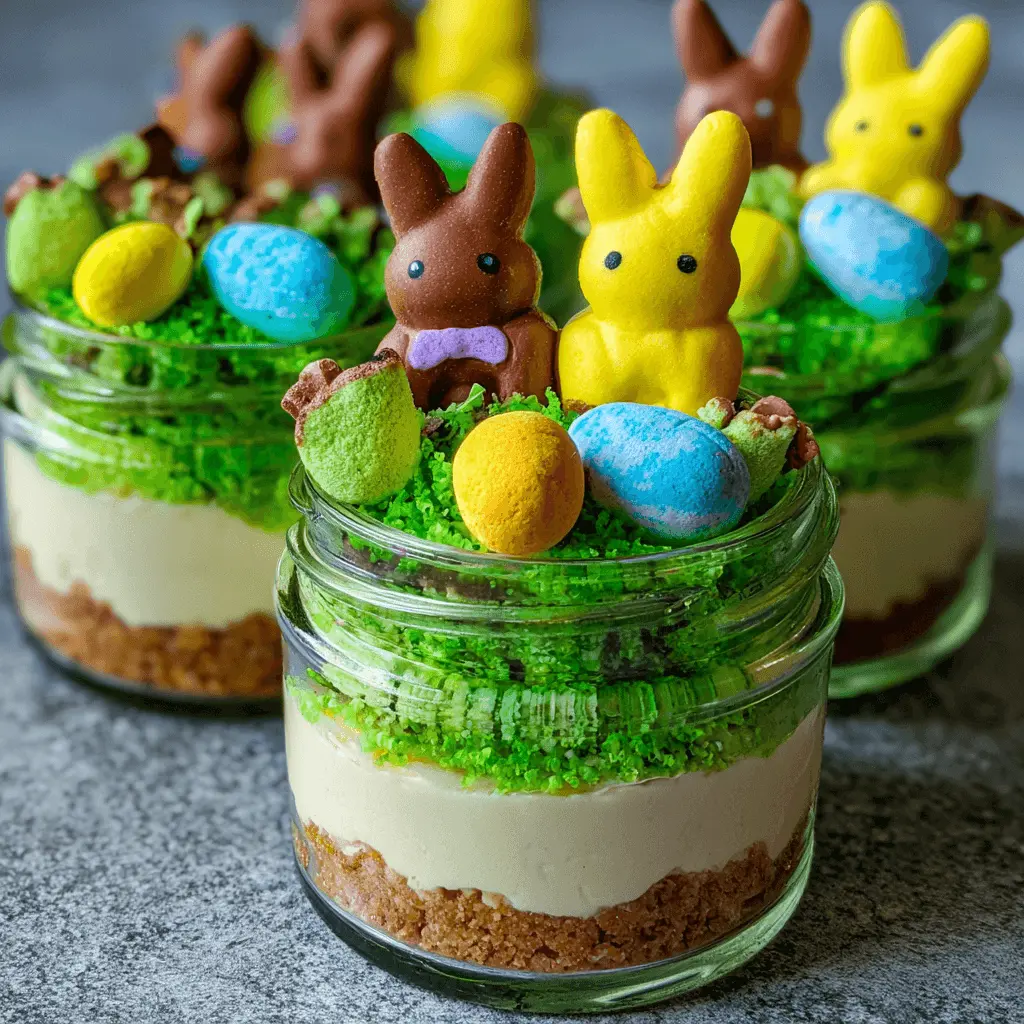
6. Decorate Your Easter Cheesecakes
While your cheesecakes are chilling or after they are completely cold, you can prepare the festive “grass” topping. In a small bowl, mix the sweetened shredded coconut with a few drops of green food coloring. Use more or less food coloring until you achieve your desired shade of vibrant green. Once the mini Easter cheesecake jars are fully chilled, sprinkle a generous amount of the green coconut “grass” on top of each cheesecake. Arrange one bunny Peep and three mini chocolate eggs on top of the green coconut in each jar. Serve your beautifully decorated mini Easter cheesecake jars chilled and enjoy!
Pro Tips & Troubleshooting
Achieving perfect mini Easter cheesecake jars is simple with a few key tricks. Understanding the chemistry of baking can elevate your results, especially when it comes to cheesecake. Sally’s Baking Recipes explains why room-temperature ingredients are essential for cheesecake. Always ensure your cream cheese is at true room temperature; this prevents lumps and creates a smooth, velvety batter. Avoid overmixing the batter, especially after adding the eggs. Overmixing incorporates too much air, leading to a puffy top that can crack as it cools. Covering the jars loosely with lids or foil during cooking is important to prevent condensation from diluting your cheesecake tops. The full natural pressure release is vital for a smooth, creamy texture and to prevent sudden temperature changes that cause cracking. If cracks still appear, they will be hidden by the fun Easter decorations! Finally, allowing the cheesecakes to cool slowly at room temperature before chilling helps them set properly and maintains their smooth surface.
Serving, Storage, and Variations
These adorable mini Easter cheesecake jars are as versatile as they are delicious.
Serving Suggestions
Serve these individual mini Easter cheesecake jars chilled for the best texture and flavor. They are perfectly sized, making them ideal for a dessert bar or individual place settings at your Easter brunch. Offer small dessert spoons for easy enjoyment.
Storage Instructions
To maintain freshness and safety, especially with dairy-based desserts, it’s always best to consult established food safety practices. According to USDA guidelines for refrigeration and food safety, proper chilling is essential. Cover any undecorated cheesecake jars tightly with their lids or plastic wrap and refrigerate promptly. If decorated, remove the Peeps and chocolate eggs before storing, as they can become sticky or melt in the fridge. Undecorated cheesecakes will last for up to 3-4 days in the refrigerator. Re-decorate just before serving for the freshest look.
Recipe Variations
Get creative with your mini Easter cheesecake jars! Experiment with different crust flavors like crushed Oreos for a chocolatey base or gingersnaps for a spiced kick. For toppings, try a homemade berry compote, a swirl of lemon curd, or even a drizzle of caramel. Beyond Peeps and chocolate eggs, you could use colorful Jelly Beans, pastel M&Ms, or small gummy bunnies for decoration. You can also vary the food coloring for the coconut grass to create different spring hues, such as light blue or pink.
Nutrition
Here’s an estimated nutritional breakdown per serving for your mini Easter cheesecake jars. Please remember that these values are estimates and can vary based on specific ingredients and brands used.
| Nutrient | Amount Per Serving |
|---|---|
| Calories | 420 |
| Total Fat | 28g |
| Saturated Fat | 17g |
| Cholesterol | 120mg |
| Sodium | 210mg |
| Total Carbs | 36g |
| Dietary Fiber | 1g |
| Total Sugars | 29g |
| Protein | 7g |
Values are approximate and may vary.
FAQ
Can I make these without an Instant Pot?
Yes, you can! You would bake them in a water bath in the oven at 325°F (160°C) for about 25-30 minutes until the edges are set but the center is still slightly wobbly.
Can I use different sized jars or ramekins?
Absolutely. If using larger jars or ramekins, you will need to increase the cooking time in the Instant Pot accordingly, usually by a few minutes per size increase.
Can I prepare these cheesecakes ahead of time?
These mini Easter cheesecake jars are perfect for making ahead! Prepare them up to 2-3 days in advance, chilling them undecorated in the refrigerator until ready to serve.
Why did my cheesecakes crack on top?
Cracking often occurs from overmixing the batter, which incorporates too much air, or from a sudden temperature change during cooling. The full natural pressure release and slow cooling help prevent this.
Can I freeze mini cheesecakes?
Yes, you can freeze undecorated mini cheesecakes. Wrap them tightly in plastic wrap and foil; they will keep for up to one month. Thaw them overnight in the refrigerator before decorating.
Conclusion
These delightful mini Easter cheesecake jars offer a stress-free way to create a memorable holiday dessert. Their quick Instant Pot preparation, individual servings, and charming Easter decorations make them a perfect choice for busy parents and beginners alike. You will love how simple it is to achieve such an adorable and delicious treat. Don’t wait; try making these festive cheesecakes this Easter! Share your creations and let us know your favorite decorating ideas in the comments below.