Welcome to the latest dessert sensation everyone is talking about: the 2-ingredient yogurt cheesecake!
Understanding the genesis of this popular dessert, a Food & Wine article explains that the 2-ingredient cheesecake trend originated in Japan, often utilizing sablé cookies for its base.
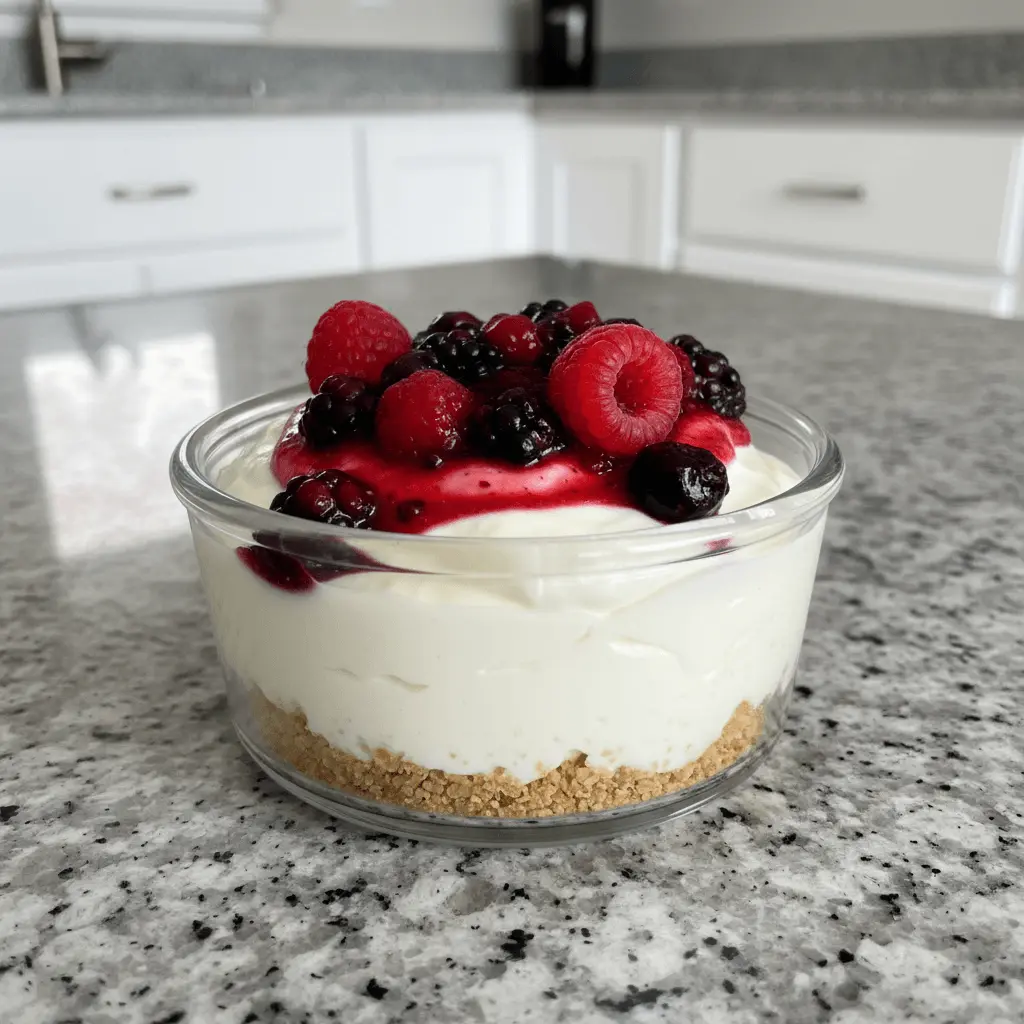
Originating from a viral Japanese trend, this incredibly simple recipe delivers a surprisingly creamy, cheesecake-like texture without any baking. Get ready to discover your new favorite easy dessert that satisfies your sweet tooth with minimal effort. This easy yogurt cheesecake is a game-changer!
Why You’ll Love This 2-Ingredient Yogurt Cheesecake
This brilliant recipe is more than just a viral hit; it’s a true kitchen hero for busy parents and beginners alike. You will adore this 2-ingredient yogurt cheesecake for so many reasons.
- Minimal Ingredients: You only need two core items, making shopping and preparation incredibly quick.
- No-Bake Dessert: Forget turning on the oven! This no-bake dessert chills to perfection, ideal for any season.
- High Protein Content: Greek yogurt provides a satisfying protein boost, making it a smarter indulgence. Beyond its delightful taste, Greek yogurt offers significant nutritional advantages; for instance, Healthline highlights its rich protein content and other health benefits.
- Versatile & Customizable: Easily adapt flavors with various cookies or toppings to suit your mood.
- Lighter Alternative: It offers all the creamy goodness of cheesecake with a noticeably lighter feel.
- Craving Crusher: Satisfy those intense cheesecake cravings effortlessly with this simple treat.
Ingredients
Creating this delightful no-bake treat starts with just a few simple components. The magic of this yogurt cheesecake truly lies in its simplicity.
- Plain Greek Yogurt: Use 1 ½ cups (375 g) of plain Greek yogurt. I highly recommend using full-fat (at least 2%) for the richest, most cheesecake-like texture. The higher the fat content, the creamier and more decadent your result will be. Don’t shy away from its natural tang; it beautifully complements the sweetness.
- Cookies: You will need 12–16 coconut sable cookies. These cookies are fantastic because they soak up the yogurt perfectly. Biscoff cookies or Oreos are excellent alternatives. Graham crackers also work well if you prefer a classic cheesecake crust flavor. The cookies transform into a soft, cake-like base once chilled.
Notes & Substitutions
You can easily adapt this recipe to fit your preferences or dietary needs.
- Dairy-Free Yogurt: Opt for thick, plain dairy-free Greek yogurts made from coconut or almond for a plant-based option. Ensure it’s thick enough to set properly.
- Richer Taste: For an extra creamy and rich flavor, whisk in 2 tablespoons (30 g) of softened cream cheese with your Greek yogurt.
- Sweeteners: Adjust the sweetness with 1 tablespoon of maple syrup or honey, to taste. Start with a little and add more if needed.
- Flavor Boosters: Enhance the flavor with 1 teaspoon of lemon juice for a brighter tang, or 1 ½ teaspoons of vanilla extract (or ½ vanilla bean pod) for classic sweetness.
Equipment
Gathering your tools beforehand makes this quick recipe even smoother. You won’t need anything fancy for your yogurt cheesecake.
- Mixing Bowl: A medium-sized bowl is perfect for combining the yogurt mixture.
- Whisk or Spatula: Use either to ensure your yogurt mixture is smooth.
- Serving Container: A small glass loaf pan, a round cake pan, or individual ramekins work beautifully.
- Airtight Container: Essential for chilling and storing any leftovers in the refrigerator.
Instructions
Making this 2-ingredient yogurt cheesecake is incredibly straightforward. Follow these easy steps to create your delicious, no-bake dessert. This is truly the simplest yogurt cheesecake you will ever make!
Step 1: Prepare the Yogurt Mixture
In your medium mixing bowl, combine the 1 ½ cups of plain Greek yogurt. If you’re adding the optional 2 tablespoons of cream cheese, make sure it’s softened and whisk it thoroughly with the Greek yogurt until the mixture is completely smooth and creamy, with no lumps remaining. Now is also the perfect time to incorporate any optional sweeteners like 1 tablespoon of maple syrup or honey, or flavorings such as 1 teaspoon of lemon juice or 1 ½ teaspoons of vanilla extract. Whisk everything together until all ingredients are fully blended and the mixture is silky smooth. This forms the luscious, tangy base of your yogurt cheesecake.
Step 2: Arrange the Cookies
Next, take your chosen serving container – whether it’s a loaf pan, small cake pan, or individual ramekins – and begin arranging your cookies. Place 12–16 coconut sable cookies (or your chosen alternative like Biscoff) upright within the container. Leave a small gap of about ½ to ¾ centimeter between each cookie. This spacing allows the yogurt mixture to seep in and fully embrace the cookies. For an even finish, press a few cookies gently around the edges of the container, ensuring they don’t stick out more than ¼ centimeter above the surface of where the yogurt will sit. The goal is to partially submerge the cookies, allowing them to absorb the moisture from the yogurt, transforming them into a soft, cake-like texture.
Step 3: Chill Until Set
Once your cookies are perfectly arranged and covered in the creamy yogurt mixture, it’s time for the chilling process. This is the most crucial step for achieving that signature cheesecake consistency. Cover your container tightly with plastic wrap. This prevents any odors from the refrigerator from affecting your dessert and helps maintain moisture. Place the covered container in the refrigerator for at least 6 hours. For the best, most firm results, I recommend chilling it overnight, or for a full 8-12 hours. Sufficient chilling allows the yogurt to firm up beautifully and the cookies to fully soften, creating the delightful structure of this yogurt cheesecake. Resist the urge to peek or cut into it too early!
Step 4: Serve and Enjoy
After sufficient chilling, your yogurt cheesecake is ready to be unveiled and enjoyed! If you want to unmold your cheesecake onto a serving plate, gently run a thin knife or spatula around the edges of the container. Carefully flip the container onto your desired plate, allowing the cheesecake to release. Alternatively, for an even simpler presentation, serve it directly from the container. This is often the easiest way to enjoy this delightful treat. Right before serving, add your favorite toppings. Drizzle with honey or jam, spoon over a fresh berry compote, or scatter fresh fruit. Now, slice into your easy creation and savor every creamy bite!
Pro Tips & Troubleshooting
Achieve perfect results every time with these helpful hints for your yogurt cheesecake.
- Yogurt Consistency: Always use very thick, high-quality Greek yogurt. This is key for a firm, cheesecake-like texture.
- Optimal Chilling: Patience is a virtue here! Don’t rush the refrigeration; 6 hours minimum ensures proper setting.
- Cookie Choice: Drier, crisp cookies like Biscoff or coconut sables absorb the yogurt best without becoming soggy.
- Flavor Balance: Taste your yogurt mixture before chilling. Adjust sweetness to perfectly balance the yogurt’s natural tang.
- Too Loose: If your dessert seems too loose after chilling, try straining your yogurt longer next time or add a few more cookies for structure.
- Too Sour: Combat excessive tartness by adding a bit more sweetener, like honey or maple syrup, or serving with naturally sweet fruit.
Serving Suggestions & Variations
This versatile yogurt cheesecake is a blank canvas for your culinary creativity! Here are some ideas to inspire you.
- Classic Toppings: Adorn your cheesecake with a generous scattering of fresh berries like strawberries, blueberries, or raspberries. Sliced fruit such as peaches or kiwi also add a lovely touch, or spoon over your favorite fruit jams.
- Sweet Enhancements: For extra indulgence, drizzle with golden honey, rich maple syrup, or a decadent caramel sauce just before serving.
- Chocolate Lovers: Satisfy your chocolate cravings by dusting the top with unsweetened cocoa powder or sprinkling mini chocolate chips over the finished dessert.
- Spice It Up: Swirl a pinch of ground cinnamon, a hint of cardamom, or a vibrant matcha powder into the yogurt mixture for a unique flavor twist.
- Individual Portions: For elegant serving, assemble your yogurt cheesecake in small ramekins, shot glasses, or clear dessert cups for ready-to-eat portions.
- Dairy-Free Delight: As mentioned, use a thick coconut or almond-based Greek yogurt alternative to create a delicious dairy-free version for everyone to enjoy.
Nutrition Information
This yogurt cheesecake offers a refreshingly lighter take on traditional cheesecakes, making it a smart choice for a dessert. It provides a good source of protein, primarily from the Greek yogurt base, which is known for its beneficial nutrients. While the cookies do contribute some sweetness and calories, this dessert remains a more balanced option compared to many richer, baked varieties. It’s a wonderful way to enjoy a sweet treat with added nutritional value.
| Nutrient | Per Serving (Estimate) |
|---|---|
| Calories | 250-350 |
| Protein | 15-20g |
| Fat | 10-15g |
| Carbohydrates | 25-35g |
| Sugars | 15-25g |
Values are approximate and vary based on specific brands of yogurt and cookies used, and any added sweeteners/toppings.
Frequently Asked Questions (FAQ)
Got questions about this viral sensation? We have answers to help you master your yogurt cheesecake.
- Can I use dairy-free yogurt? Yes, absolutely! Just make sure to choose a very thick, plain dairy-free Greek yogurt for the best results.
- Is this cheesecake a healthy dessert? It’s a lighter option compared to traditional cheesecakes due to its yogurt base, offering higher protein content.
- How long does yogurt cheesecake last? Store your cheesecake tightly covered in the refrigerator for 3-4 days; the cookies soften further over time.
- What type of cookies are best? Dry, crisp cookies like Biscoff, coconut sables, or even simple digestive biscuits work wonderfully.
- Can I make it ahead of time? Yes, making it the day before is highly recommended, as it gives the cheesecake ample time to chill and set perfectly.
Conclusion
There you have it – the incredibly simple, surprisingly delicious 2-ingredient yogurt cheesecake! This no-bake wonder truly lives up to its viral reputation, offering a creamy, satisfying dessert with minimal fuss. We hope you’re excited to try this easy recipe and discover just how effortless baking can be, even for beginners. Whip up this fantastic yogurt cheesecake today, share your creations, and let us know what you think in the comments below!