Welcome the holiday season with a dessert that brings joy without the stress. This no bake Christmas cheesecake is an absolute game-changer for festive celebrations. Forget oven woes and complicated steps; this simple, creamy recipe delivers delightful flavor with minimal effort. It is truly the perfect choice for stress-free holiday entertaining.
Why You’ll Love This No Bake Christmas Cheesecake
This simple no bake Christmas cheesecake quickly becomes a holiday favorite. You’ll adore it because:
- No oven is required, making it a perfect holiday dessert for busy kitchens.
- Preparation is quick, requiring minimal hands-on time, which is great for parents and beginners.
- It offers a rich, creamy texture that melts in your mouth.
- The recipe is incredibly customizable for any Christmas theme you envision.
- It is ideal for family gatherings, feeding a crowd effortlessly.
- You can easily make this festive treat ahead of time, freeing up your holiday schedule.
Ingredients
Gather these simple ingredients to create your delicious no bake Christmas cheesecake:
For the Crust:
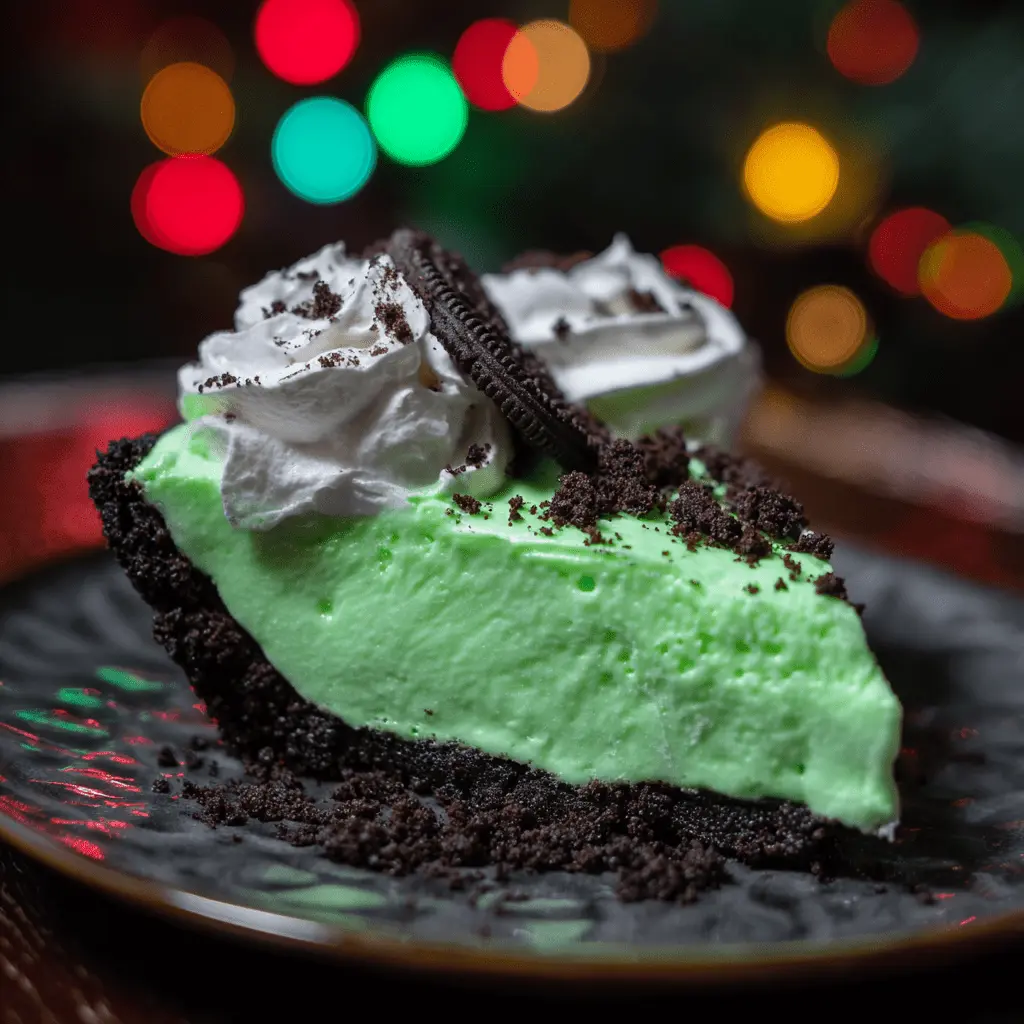
- 36 Oreos, crushed (about 3 cups finely crushed)
- 1/2 cup Unsalted Butter, melted
For the Filling:
- 4 (8 oz) packages Cream Cheese, softened (full-fat works best)
- 2 cups Powdered Sugar
- 16 oz Cool Whip, thawed (or homemade whipped cream)
- Neon Green Food Coloring (optional, for a festive touch)
- 1 teaspoon Vanilla Extract (pure, good quality)
Notes & Substitutions
For the crust, feel free to use gingersnaps or authentic German spritz cookies instead of Oreos.
To achieve the smoothest possible filling, it’s essential to use room temperature cream cheese, as cold cream cheese can result in a gritty texture.
You can substitute homemade whipped cream for Cool Whip; just whip heavy cream to stiff peaks. Adjust powdered sugar to your preference, and consider other flavor extracts like almond or peppermint for a unique twist on this easy holiday cheesecake.
Equipment
You won’t need much to whip up this delightful dessert. Here is what you will need:
- A 9×13 inch baking dish
- Food processor or a large Ziploc bag and rolling pin
- Large mixing bowls
- Electric mixer (stand or hand-held)
- Rubber spatula
- Measuring cups and spoons
- Optional: An offset spatula for perfectly smooth spreading
Instructions
Creating this easy no bake Christmas cheesecake is a breeze. Follow these simple steps for a perfect holiday treat.
Step 1: Prepare the Crust.
Place your Oreos in a food processor and process until they become fine crumbs. If you do not have a food processor, place them in a large Ziploc bag and crush them with a rolling pin. In a medium bowl, combine the finely crushed Oreos with the melted butter. Mix until the crumbs are evenly moistened. Distribute the mixture evenly into your 9×13 inch pan. Press down firmly and evenly to form the crust. Use the bottom of a glass or your hands to compact it well. Place the crust in the refrigerator to chill while you prepare the filling.
Step 2: Make the Filling.
In a large mixing bowl, use your electric mixer to beat the softened cream cheese until it is completely smooth and creamy, about 2-3 minutes. Gradually add the powdered sugar, beating until fully combined and no lumps remain. Stir in the vanilla extract gently. If using Cool Whip, gently fold it into the cream cheese mixture with a spatula until just combined. If making homemade whipped cream, whip chilled heavy cream to stiff peaks in a separate bowl, then carefully fold it into the cream cheese mixture. Now, if you desire a festive green hue, beat in the neon green food coloring until you reach your desired shade. Do not overmix the filling once the whipped cream is incorporated.
Step 3: Assemble the Cheesecake.
Retrieve your chilled crust from the refrigerator. Evenly spread the cheesecake filling mixture over the prepared crust. Use a rubber spatula or an optional offset spatula to smooth the top for a polished look.
Step 4: Chill Thoroughly.
Cover the baking dish tightly with plastic wrap. This step is crucial for the cheesecake to set properly. Refrigerate your assembled no bake Christmas cheesecake for a minimum of 4-6 hours. For the best possible set and easiest slicing, chilling it overnight is highly recommended.
Step 5: Garnish and Serve.
Once thoroughly chilled and firm, remove the plastic wrap. Before serving, add any desired toppings or garnishes. To slice clean portions, use a long, sharp knife. For perfectly neat slices, dip the knife in hot water and wipe it clean between each cut. Enjoy your festive creation!
Pro Tips for the Best No Bake Christmas Cheesecake
Achieve perfection with your holiday cheesecake by following these simple pro tips:
- Room Temperature Ingredients: Always ensure your cream cheese is fully softened for a perfectly smooth, lump-free filling.
- Don’t Overmix: Overmixing the cream cheese mixture, especially after adding whipped cream, can deflate the air and result in a less firm cheesecake.
- Press Crust Firmly: Compact the crust well into the pan. This prevents it from crumbling when you slice and serve your delicious no bake Christmas cheesecake.
- Chill Time is Key: Do not rush the chilling process. Ample time in the refrigerator is crucial for the cheesecake to set properly and hold its shape.
- Clean Slices: Use a warm, damp knife for clean cuts. Wipe the knife after each slice to maintain neat presentation.
- Taste and Adjust: Taste your filling before chilling. Adjust the sweetness or add more flavoring extracts to suit your personal preference.
Serving, Storage, & Variations
This versatile no bake Christmas cheesecake offers many ways to enjoy and customize.
Serving Suggestions
- Classic: A dollop of extra whipped cream and a sprinkle of festive red and green sprinkles.
- Fruity: Top with fresh cranberries, pomegranate seeds, or a homemade cranberry compote.
- Chocoholic: Drizzle with chocolate sauce, add mini chocolate chips, or sprinkle with cocoa powder.
- Grinch Theme: If you used green food coloring, add a small red candy heart on top of each slice.
Storage Instructions
Cover leftover cheesecake tightly with plastic wrap and refrigerate for up to 3-4 days. For longer storage, slices can be individually wrapped in plastic wrap and then aluminum foil, then frozen for up to 1 month. Thaw frozen slices overnight in the refrigerator before serving.
Variations
- Grinch Cheesecake: Use neon green food coloring for the filling and add a single small red candy heart on top.
- Peppermint: Incorporate 1 teaspoon of peppermint extract into the filling and sprinkle crushed candy canes over the top.
- Gingerbread: Use gingersnap cookies for the crust and add 1/2 teaspoon of gingerbread spice to the cream cheese mixture.
- Chocolate: Opt for a chocolate cookie crust and fold in 1/2 cup of mini chocolate chips into the filling.
- Eggnog: Add 1-2 teaspoons of eggnog extract to the filling and finish with a dusting of fresh nutmeg.
Nutrition
Please note that the nutritional information provided is an estimate. It can vary significantly based on specific ingredients, brands used, and portion sizes. We encourage using an online nutrition calculator with your exact ingredients for precise values.
| Per Serving (Estimate) | Amount |
|---|---|
| Calories | 550-650 |
| Total Fat | 40-50g |
| Saturated Fat | 25-30g |
| Cholesterol | 100-120mg |
| Sodium | 300-400mg |
| Total Carbohydrates | 50-60g |
| Dietary Fiber | 1-2g |
| Total Sugars | 40-50g |
| Protein | 5-7g |
These values highlight the impact of rich ingredients like cream cheese, butter, and sugar on the overall nutritional content.
Frequently Asked Questions (FAQ)
How long does this cheesecake need to chill?
Your no bake Christmas cheesecake needs a minimum of 4-6 hours in the refrigerator. For the best set and easiest slicing, chilling it overnight is highly recommended.
Can I use homemade whipped cream?
Yes, absolutely! Whip 2 cups of heavy cream with 1/2 cup powdered sugar until stiff peaks form, then gently fold it into the cream cheese mixture. For safe handling, ensure that homemade whipped cream is refrigerated promptly and stored properly to prevent spoilage.
Can I make this cheesecake ahead of time?
Yes, this recipe is perfect for making ahead! You can prepare it 1-2 days in advance and keep it covered in the refrigerator.
Why is my no-bake cheesecake runny?
This usually happens due to insufficient chilling time, or if the cream cheese was overmixed, causing it to lose its firm structure. Ensure your ingredients are at room temperature and chill adequately.
Can I make this in a springform pan?
Yes, you can! A 9-inch springform pan works wonderfully for this recipe. It allows for easier slicing and a more elegant presentation.
Conclusion
This no bake Christmas cheesecake truly embodies the spirit of simple, joyful holiday baking. It is wonderfully easy to prepare and absolutely delicious, making it a perfect addition to any festive celebration. We encourage you to create this creamy, dreamy dessert and share it with your loved ones this season. Don’t forget to share your experiences and rate this fantastic recipe!